Here are a few links for tutorials for Adobe Premiere.
Or... http://tv.adobe.com/watch/cs6-creative-cloud-feature-tour-for-video/introduction-to-adobe-premiere-pro-cs6/
Also, click HERE to learn about linking work from Premiere Pro with After Effects
or HERE (which includes why Premiere is awesome)
click HERE for some excellent tips on creating a "film" look using a DSLR camera
Monday, December 12, 2016
Monday, November 28, 2016
Instructions for Photoshop "movie poster" exercise
You were asked to design a fake movie poster, using at least two different photos - taking someone off of their original background and putting them on another background using MASKS.
Parameters:
12x18" @ 72 ppi
Minimum 2 different images
Must include text (movie title and credits - Steel Tongs Font)
Layers must be labeled
Put finished Myname_poster.psd in the movie poster folder AND post the .jpg on your blog.
Briefly write about the technical procedure. What tools did you use and what steps did you take from start to finish.
Due - end of period Monday November 28, 2016
Digital Surrealism begins tomorrow!
Surrealism Research and Presentation - Year One Tech
Digital Surrealism - Year One
Surrealism is an artistic movement that was founded in the early 1920s. It's influences include Sigmund Freud (famous psychoanalyst who was fascinated by the subconscious mind and dreams). "Surrealism style uses visual imagery from the subconscious mind to create art without the intention of logical comprehensibility." In other words, it doesn't make sense in the real world, only the surreal world. Surrealism includes an element of surprise and uses unlikely juxtapositions and blends dream and reality.
Please research Surrealism in Art and/or photography and create a prezi presentation that includes the following: (Please post your finished presentation on your blog by Tuesday December 6, 2016. Ready to present please!)
Presentations will begin on Tuesday and will probably carry on to Wednesday's class.
1. How do you define Surrealism? (In your own words please!)
2. Pick one Surrealist artist and:
Presentations will begin on Tuesday and will probably carry on to Wednesday's class.
1. How do you define Surrealism? (In your own words please!)
2. Pick one Surrealist artist and:
- Briefly discuss their view on surrealism (or their ideas and thoughts about the kind of art they create) or on their style of art (they may not define themselves as surrealist artsists)
- The years they produced art (or birth-death)
- How they got started - creative journey (school, apprenticeship, studying under other artists etc.)
- What their interests were/are as artists--subjects they addressed, issues they focused on
- Were they part of other artistic movements? If so, which ones?
3. Show 8 examples of Surrealist art by the artist you have selected. Choose ONE to analyze based on elements and principles of design, composition, what you like about it, how it's a good example of surrealism (if it is).
4. Please include any and ALL links that you have used to find your information. Please do not copy and paste directly from these links!! That's called plagiarism and it's a big fat NO-NO!
5. You must include a reference list at the end of your presentation, AND embed a minimum of 3 links (they could be videos, audio interviews or just other websites with more information) into your prezi presentation.
6. Make the presentation surreal to some degree in terms of design, but make sure we can clearly see and identify the artist's works, as well as the text that answers the questions above.
Legibility and readability are, as always, very important.
Please pick one artist each so that we can cover all of them. Or, you might find one on your own.
- Max Ernst
- Andre Breton
Man RayMaurice Tabard- Dorothea Tanning
Salvador DaliRene Magritte- Joan Miró
- Marcel Duchamp
-
Giorgio de Chirico Leonora Carrington- Alberto Giacometti
Hieronymus Bosch- Yves Tanguy
MC EscherErik Johansson(modern day photographer)Jerry Uelsmann(modern photographer who worked with negatives to create surrealist photos)- Dada (the movement)
- Martin De Pasquale
Thom Easton- Roby Dwi Antonio
- Jean Giraud "Moebius"
Alastair MagnaldoCharlie Davoli
Monday, November 21, 2016
Reminder: Saving your work
When you finish editing your photos, they should be saved as PSDs (working files) AND as JPGs (finished files for blog post).
Please make sure that your FINAL photos are placed in the FINAL EDITED PHOTOS folder under Year 1 PHOTOGRAPHY. Make a folder with YOUR NAME on it - as demonstrated by the example. Inside that folder, you should have ONE folder called WORKING FILES (PSDs) and the other called FINISHED FILES (JPGs).
Save your photos with a unique file name i.e. PORTRAIT2_DSC11O.jpg
Name the photos according to the compositional rule or portrait 1 or 2, but keep the original file name in the name by adding your unique file name at the beginning of the file name.
Due: Posted on your blog AND dropped into the folder by the end of the day Monday, Nov. 21, 2016
Ryerson Portfolio Day this Friday November 25th
Dear all, (Guidance Counsellors and teachers of Visual Art, CyberArts, Media Arts and CommTech)
In conjunction with the Faculty of Communication and Design (FCAD) open house - FCAD IN ACTION -
your students will have the opportunity to meet with faculty and students from the
Photography & Integrated Digital Studies Program offered through the School of Image Arts.
The open house is a day-long event that includes presentations by all of the FCAD Schools: Image Arts, Journalism,Creative Industries, Graphic Communications Management, Performance, Interior Design,
Professional Communications, Fashion and RTA-Media. These presentations and tours will be available to your students through the day.
Faculty/students from the Photography & Integrated Digital Media program will be available to meet with your students in the Image Arts Building from noon to 4pm. The purpose of these
meetings is to advise students on the submission of their portfolios in the new year.
Your students can bring their work in digital form and should sign up using this link:
If you have any questions and/or require additional information let me know.
Best regards,
Robert
Robert Burley, Associate Professor
Program Director, Photography & Integrated Digital Studies
School of Image Arts
Ryerson University
350 Victoria Street
Toronto, ON M5B 2K3
Phone (416) 979-5000 ext.3676
Fax (416) 979-5139
Wednesday, November 16, 2016
Year 1 Tech Photo Assignment
Once you have taken all of your composition photos AND your portraits, and uploaded them using Image Capture, you're ready to select and edit.
Use Adobe Bridge CS6 to view, rate and select your photos for editing.
You should find your best photos of the following:
Success criteria: Accurately represents the rules of composition and blur techniques, in focus (where the focus should be), exposure, simplified background.
Rule of Thirds
Pattern
Framing
Leading Lines
Fill the Frame
Selective Focus
AND
Intentional Blur
Panning
Zoom Blur
AND
2 of your best portraits
- Success criteria for portraits: Expression, lighting, composition, simplified background, in focus, exposure
You will have 10 photos in the end.
Post each photo and label it accordingly. Write about why you think it best represents the composition/blur technique and also what you like about the photo.
For the portraits, discuss the lighting situation and whether or not a reflector was used as well.
Friday, November 11, 2016
ULU - NAC10
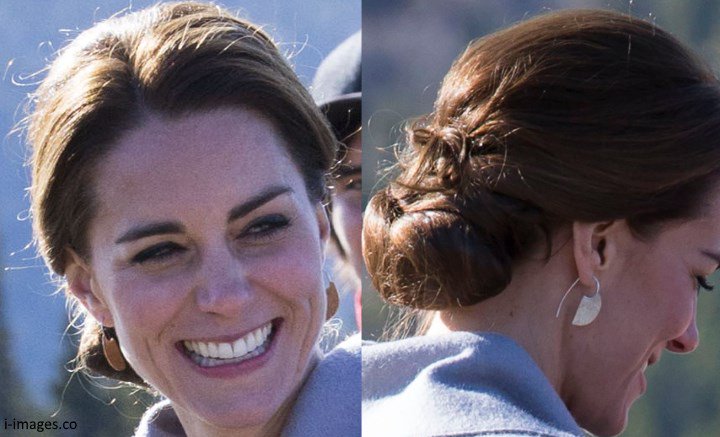
An ulu (Inuktitut syllabics: ᐅᓗ, plural: uluit, English: "woman's knife"[1]) is an all-purpose knife traditionally used by Inuit, Yup'ik and Aleut women. It is utilized in applications as diverse as skinning and cleaning animals, cutting a child's hair, cutting food and, if necessary, trimming blocks of snow and ice used to build an igloo.
Read this article about Kate Middleton wearing earrings inspired by the Ulu.
Consider issues surrounding cultural and colonial appropriation, the role of the Royal Family in relationship to Canadian and indigenous sovereignty, and the influence of fashion and fame.
There is a lot to think about!
Read this article about Kate Middleton wearing earrings inspired by the Ulu.
Consider issues surrounding cultural and colonial appropriation, the role of the Royal Family in relationship to Canadian and indigenous sovereignty, and the influence of fashion and fame.
There is a lot to think about!
Thursday, November 10, 2016
TDSB Skills competition poster/tshirt
Please enter this contest! Deadline is November 30th
https://docs.google.com/document/d/15ZEWQDQrFaKceXoadi0ojmR_zwCt10fJO-qNKoJxnTo/edit
https://docs.google.com/document/d/15ZEWQDQrFaKceXoadi0ojmR_zwCt10fJO-qNKoJxnTo/edit
Wednesday, November 9, 2016
Year 3 reminders
please make sure you have done the following.
Music videos through the decades. Plus cinematography learning on digital overdrive. Portraits from Steve Carty workshop. Best 5 portraits from portrait assignment. 3 lighting situations exercise (funding images from web) plus 3 portraits in different lighting. Open shade. Direct sunlight. Window light.
Music videos through the decades. Plus cinematography learning on digital overdrive. Portraits from Steve Carty workshop. Best 5 portraits from portrait assignment. 3 lighting situations exercise (funding images from web) plus 3 portraits in different lighting. Open shade. Direct sunlight. Window light.
Monday, November 7, 2016
Year 1 Tech Photoshop Intro
Photoshop Tutorial #1 - Tuesday Nov. 8 2016
Photoshop - 10 things everyone needs to know
CLICK HERE FOR THE LINK in case it doesn't work.
Watch the video and take notes if you need to. In particular pay attention towards the end where he removes the subject from the background and replaces the background.
Using your photos from last week, see what you can do to practice some of the techniques you learned from the video.
Watch the video and take notes if you need to. In particular pay attention towards the end where he removes the subject from the background and replaces the background.
Using your photos from last week, see what you can do to practice some of the techniques you learned from the video.
Thursday, November 3, 2016
Storyboards - The what, how and why. Year 3 Tech
Click HERE to read an article discussing the how-to of storyboards with templates you can download with various types of storyboards.
Click HERE for more storyboard templates that you can download and print.
You're going to want a storyboard that gives you some space to write some notes - about audio, any special effects etc.
Also, take note in the article that the person writing it is a storyboard artist! That's his job. So, something to think about as a career path if you love that idea.
STORYBOARD FOR MUSIC VIDEO!!! To the left, if you click there, you'll find a great article that's specifically about creating storyboards for music videos. Worth checking out!
Monday, October 31, 2016
Year One Composition in PHotography
1. Watch the first 30 minutes (31:18 to be precise) with the class.
2. Find one really good example of each of the following rules of compositon:
¨ Rule of Thirds
¨ Pattern or Interrupted Pattern
¨ Leading lines
¨ Fill the frame
-->
¨ Framing
Friday, October 28, 2016
Year One - Shutter Speed, Aperture and ISO
Understanding Shutter Speed, Aperture and ISO
1. Use the DSLR camera simulator from the artistic links menu on the CyberARTS blog to understand how all of the options modify your results.
2. Find examples of photographs that demonstrate both fast shutter speeds and slow shutter speeds.
At least 2 (1 of each)
3. Find examples of photographs that demonstrate both shallow depth of field (shorter range of focus) and wide depth of field (long range of focus).
At least 2 (1 of each)
4. Post the photos on your blog with a brief explanation of how you know which example is demonstrated.

CLICK HERE for a great link about shutter speed
CLICK HERE for a great link about shallow depth of field
Friday, October 21, 2016
Music Videos - Through the Decades AND Cinematography (Year 3 Tech) For Monday - Wednesday Oct 24-26
TWO ASSIGNMENTS!!!
1. Music videos through history
2. Chapter 6 in Digital Overdrive
1. YEAR 3 TECH: Music videos over the last 3 decades
Check out the technology used in this music video. You need to open it in Google Chrome. It uses HTML 5.
Also, please take a look at the history of music videos - which began in the 1980s with MTV. According to U.S. Time magazine, these are the best 30 music videos of all time.
Here is another "Best 30 Music Videos of All Time" by Music Radar
These seem a little more underground. Also more contemporary. Check them out as well.
Check out #22 Chemical Brothers - Star Guitar for some amazing editing and perfect sync-ing.
Take a look through both the Arcade Fire video and the article on the 30 best music videos. Watch a minimum of 9 of the videos and read the summaries below - making sure you watch at least 2 per decade. There are 10 per decade in the article.
Exercise:
FIRST Write a blog post...
1. Summarizing your thoughts, opinions and inspiration from the 9 videos you watched.
2. Which ones do you consider works of art in their own right? and Why? Note: The first video - Talking Heads "Once in a Lifetime" was exhibited in New York's Museum of Modern Art.
3. Also, comment on the types of changes you noticed through the decades. (Lighting, editing, sophistication, pace etc.)
4. How does the Arcade Fire video compare to the earlier decades?
5. What's next in music videos in your opinion?
THEN...
Embed one video (the ones you find the most compelling, artistically) into your blog post
1. Comment on the pacing, artistic style, lighting and artistic intent/meaning of the posted video.
2. How does this video visually express the emotional theme of the music? Look at specific imagery, pace, style, lighting as well as cinematography (composition of the shots).
2. YEAR 3 TECH: Chapter 6 in Digital Overdrive
Finish this assignment and then move on the following chapters in Digital Overdrive
Click HERE or Go to www.clouddoi.com
Click on Existing User - Find your school - Lakeshore
User name - lakeshore
password - lci2016! (don't forget the ! )
You will need to review the following chapters and complete the tests at the end of each section. Put in your own email address and the results will be emailed to you. Once you receive the email, forward the results to me at lisa.silverman@tdsb.on.ca
And/or you can create your own account by logging in.
Chapter 6 - Intro to Cinematography
Shooting Style
Rules of Cinematography
Basic Lighting
After completing all three sections, complete the review questions for the chapter.
We will be reviewing some of the key points on Monday. Please make sure you complete all of this by Thursday Oct 27th
Year One Tech - Photography Assignments for Monday Oct 24-Wed Oct 26
Go to the following link: www.clouddoi.com
Sign in using the following:
Click on Existing User
(Note: if the link doesn't work, re-type or cut and paste the url into your browser window)
Your school name: Lakeshore Collegiate (you might need to find this on a list)
Your user name: lakeshore
Your password: lci2016! (that's an exclamation mark at the end!)
Go to Chapter 14 - Photography
You will be working your way through the 3 chapters over the next few days in preparation for hands on learning and shooting by the end of the week.
Start with
History of Photography - Read the entire chapter, then do the review sheet at the end and take the test. In order to save your work - create an account. Then put my email address in so I can get the results - or email them to yourself, then forward the finished work/results to me at
lisa.silverman@tdsb.on.ca
Then go to
Digital Photography - Read the entire chapter and do the review sheet AND take the test
Then go to Photography Basics - Read From Aperture to Parts of a DSLR camera
Wednesday, October 19, 2016
Year One Tech - Logo Submission
Please post your final logos on your blog. Final blog post due: Friday October 21st at the beginning of the period. We will be starting photography on Friday.
Scroll down to see the exemplar provided. (Miami Nights)
Make sure you EXPORT your Adobe Illustrator file as a PNG and remember to export the artboards you need to export as separate files.
Post the following:
Pictographic Roughs
Typographic Roughs
Combined Roughs
Pictographic Final (should included one black and white and one colour)
Typographic Final (one black and white and one colour)
Combined Final (one black and white and one colour)
Please write the following:
Discuss and justify your design choices you made for your logo by answering the following questions:
1. Explain your "company" - what do you do, who is your target market, and what is your style and personality (3 adjectives you picked initially).
2. Explain your choice of image (object/animal) and justify why that choice connects well with your company's personality (question 1)
3. Discuss your choice of the following elements and principles of design:
Line (thick, thin, rough, smooth, curvy, straight etc.) - explain based on what you know about how a line can express mood
Colour (look up colour psychology and discuss your choices based on your company and also visual aesthetics)
Shape (how your use of shapes helped to define your object/animal)
Emphasis (what stands out and why - discuss visual hierarchy - where your eye goes first, based on size relationships, colour, boldness etc.)
Contrast (how did you use contrast to create visual interest and variety)
4. Discuss any challenges you had using Adobe Illustrator and what you did to overcome them
5. What did you learn from this assignment?
Year 3 Tech Music Videos
To begin researching music videos, please go to the following link, read the chapter and do the Review Questions as well as the End of Chapter Test.
www.clouddoi.com
To log in
Your school name: Lakeshore Collegiate Your username: lakeshore Your password: lci2016!If the link isn't working, type in the URL into your browser.
password has an exclamation mark at the end!
Go to the Chapter 12 Music VideosRead the chapter and do the Review Questions as well as the testTo be able to save your work as you go, log in and create an account.
Monday, October 17, 2016
Final Illustrator Instructions - Year One Tech
Once you have finished tracing your object/animal, create 9 - 16 copies in one Illustrator file to alter the colours/tones for each one. You need to submit this as one of your final copies.
Make sure you copy and paste the original with all the layers so that you can easily change the colours of the various shapes within the image.
Due by the end of the period today:
Minimum - Page of Pictographic roughs AND typographic roughs
We will begin combined roughs Tuesday and aim to be completely finished this assignment by Thursday. Friday we will begin photography.
1. Rough pictographic logo.
It should look something like this:
All images below by Joseph Walsh (currently in CyberARTS Year 2)
Pictographic Rough

2. Next begin exploring ideas for typographic logos. Look here to read about typographic logos. Here is an example of a page of typographic roughs:
Typographic Roughs

3. Once you have chosen your favourite typographic and pictographic from your page of roughs, you can explore combining the two together.
It should look something like this:
Combined Roughs

4. Please post your 3 rough files - pictographic roughs (image only) - typographic roughs (type only) and combined roughs (both together).
5. Together with Ms. Silverman and your peers you can select which of the three is your favourite and create a black and white and colour version of your final. It should look something like one (or all) of these:
Combined Final

Typographic Final

Pictographic Final

Tuesday, October 4, 2016
Year One - Illustrator tracing exercise
Click on the link below to download a tracing exercise to DOWNLOAD, and then open in Adobe Illustrator. You will find the file in downloads (either through the finder or on the bottom menu)
You can then lock the bottom layer and trace over top of the lines in a different colour.
http://bit.ly/11kp9Cs
Please be aware that there are 4 artboards. Make sure you complete all 4 of the artboards.
Due at the end of the period today.
If you prefer to view the video, or watch the beginning of it to get the idea, it is available below.
Monday, October 3, 2016
After Effects Tutorials for Anthony and anyone else needing a refresher - Year 4 Tech
After Effects Basics with Terry White
Start here and watch the 10 tips beginners want to know.
Take notes and open After Effects to DO as you WATCH!! Go at your own pace.
Syncing text to audio. VERY IMPORTANT 10 MINUTES OF YOUR LIFE!!!
Please watch this and then watch it again if need be! Remember the shortcuts, write them down and use them!
Also, there are many videos on After Effects on Video Copilot
Here's another video on Basic typography and motion graphics that may also be helpful.
Friday, September 30, 2016
Year 3/4 Portrait lighting workshop assignment for certification
Go through your photos from the lighting workshop and select and edit 3 portfolio quality images.
Ideally you should choose at least one in the studio.
Post each on your blog and write an analysis of each one discussing the following:
Light - discuss natural vs. artificial light and any details that demonstrate your learning from the workshop with Steve Carty. (Direction, placement, distance, angle, number of lights etc.) Also, whether a reflector was used and what that may have contributed to the photo.
Background to subject relationship (distance from the background and choice of background)
Expression - discuss what works about the expression on the subject's face.
Composition - placement of subject in frame - vertical vs. horizontal.
For studio shots please add a diagram (you can do this quickly in photoshop or illustrator and save as a jpg) of your subject, lights, background and camera placements - see Steve's diagrams.
Once this is completed, you will be eligible to receive your certification!
Way to go everyone!
Wednesday, September 28, 2016
Pen Tool Tips and Tricks for Illustrator - Year One Tech
A few things to remember when using Adobe Illustrator to trace a photo:
1. USE LAYERS:
a) Put your photograph on layer 1, lock it so it doesn't move around and then make a new layer to trace the parts of the photograph.
b) Use a new layer for each segment of the object you are tracing so that you can easily control, arrange and manipulate each layer.
c) Rename and label each layer so you know what's on it. ie. Head, facial features, ears etc.
2. USE AS FEW POINT AS POSSIBLE WITH THE PEN TOOL
a) Try clicking each time your line changes direction and not every few millimetres (which will give you hundreds of annoying little nodes that will make you crazy!)
b) Use the pen tool to create curves. You will have better control if you learn to use anchor points and handles to create your vector illustrations.
Review the tutorials I posted a few days ago and keep practising.
Spend today working on creating a traced version of one of the photographs that you selected as your logo image.
Subscribe to:
Posts (Atom)